In this tutorial, we’ll create a handsome hipster character in a trendy, flat style (complete with a pompadour and beard!). You’ll learn how to use simple geometric shapes, Live Corners, and the Stroke and Align panels. By the end of this tutorial, you’ll be able to create your own avatar in the same style. Let’s get started!
Tutorial Details: Flat Hipster Character
- Program: Adobe Illustrator CS6 – CC
- Difficulty: Intermediate
- Topics Covered: Basic Shapes, Stroke panel, Align panel, Live Corners
- Estimated Completion Time: 20 Minutes
Final Image: Flat Hipster Character

Step 1
Let’s start designing the head of our character. Take the Rectangle Tool (M) and create an 180×220 px shape, applying a skin-tone color. Select the shape with the Direct Selection Tool (A) and set the Corners radius to 72 px in the control panel on top. Another way to make the corners rounded is to pull a tiny circle marker of the Live Corners, using the Direct Selection Tool (A).

Step 2
Now we’ll add the eyes. Use the Ellipse Tool (L) while holding Shift to make a 15×15 px dark-brown circle for the left eye. Hold Alt-Shift and drag the circle to the right, using the Selection Tool (V), this way creating a copy.
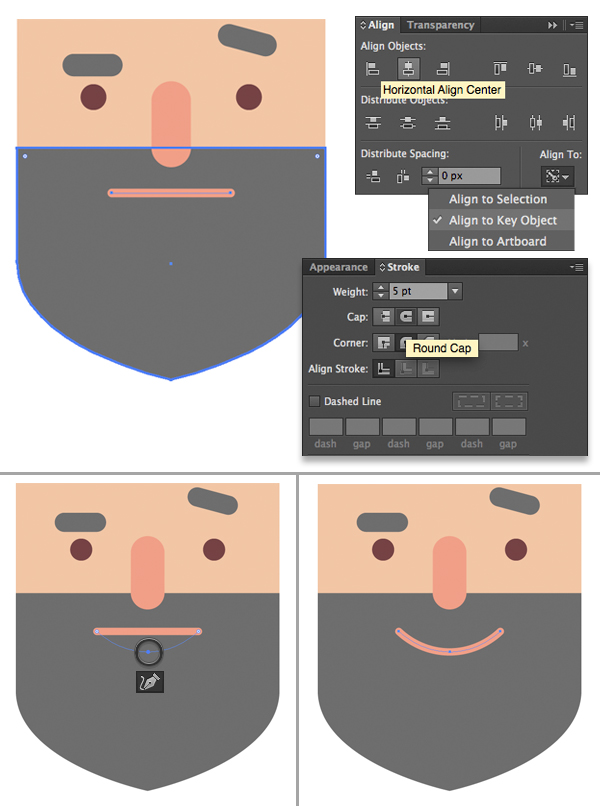
Group (Control-G) the eyes and let’s make sure they are perfectly centered to the face. Select both the eyes group and the head shape and click the head once again to make it a Key Object (you will notice a thicker selection around it). Open the Align panel and click Horizontal Align Center. There we have it!

Step 3
Let’s add the eyebrows so that our character can have a certain facial expression. Take the Rounded Rectangle Tool and make a 35×13 px grey shape with fully rounded corners. Remember that you can adjust the Corners radius of the shape from the control panel on top while the shape is selected with the Direct Selection Tool (A).
Drag the shape to the right while holding Alt-Shift to make a copy.
Select the second brow and double-click the Rotate Tool (R). Set the Angle to -15 degrees and click OK to apply the changes. Drag the brow up a bit.
Get millions of stock images and videos at the best price
Unlimited access. No attribution required. Starts at just $9/month.

Step 4
Arm yourself with the Rounded Rectangle Tool and let’s form the nose! Create a 23×50 px pink shape with fully rounded corners. Align the nose to the face, using the Align panel.

Step 5
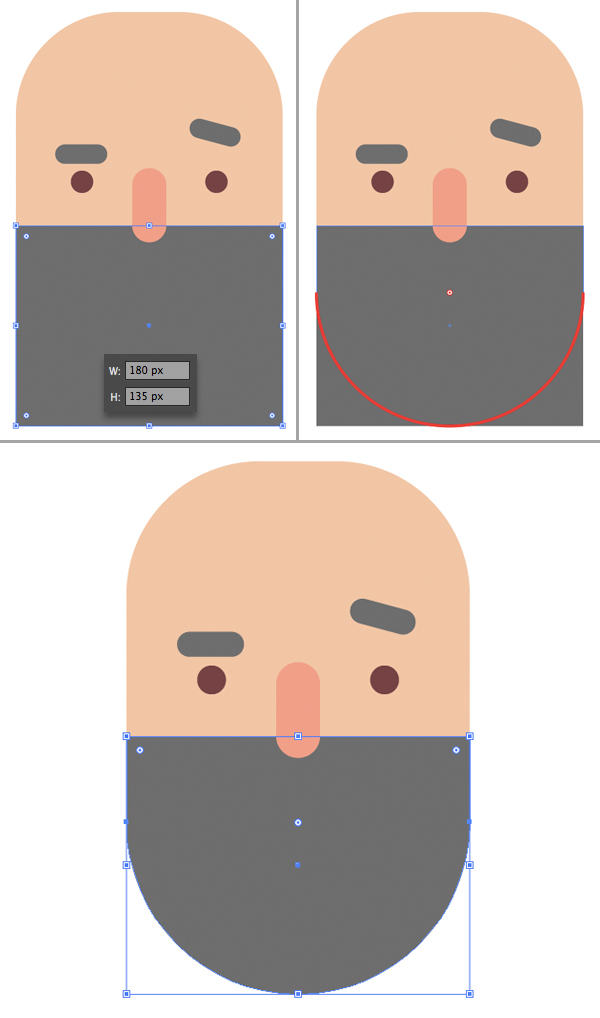
Now we’ll add a thick, bushy beard! Take the Rectangle Tool (M) and draw an 180×135 px shape (the same width as we have for the head). Align the beard to the head and place it as shown in the image below. Press Control-[ to Send the shape Backwards, beneath the nose.
Select the bottom anchor points of the beard with the Direct Selection Tool (A) and make the corners fully rounded.
Step 6
Select the anchor points at the very bottom of the beard using the Direct Selection Tool (A). Head to the control panel on top and Convert selected anchor points to corner, making the beard pointed.
Step 7
Select both left and right side anchor points and drag them down, changing the shape of the beard slightly.
Step 8
Now let’s create a mouth. Use the Line Segment Tool (\) or the Pen Tool (P) while holding Shift to make a horizontal line. Set the Stroke color to pink in the Color panel.
Open the Stroke panel and set the Weight to 5 pt, making the line thicker. Set the Cap to Round Cap, making the tips of the stroke rounded.
Our character looks too serious right now, so let’s make him smile! Grab the Curvature Tool (Shift-‘) and bend the line slightly by dragging its middle point down, this way making the lips arched and smiling.
Step 9
Let’s style a fancy pompadour hairdo for our hipster guy. Create an 180×80 px shape of the same grey color as we have for the beard and brows (use the Eyedropper Tool (I) to pick the needed color).
Extend the shape by dragging its left edge further left. Then select the top right and bottom left anchor points with the Direct Selection Tool (A) and make the corners fully rounded.

Step 10
The last (but not least) thing we need to do here is add the ears. Use the Rounded Rectangle Tool to make a 30×50 px shape with 14 px Corners Radius.
Keeping the rectangle selected, go to Object > Path > Offset Path and set the Offset value to -7 px to create the inner part of the ear. Fill the inner shape with darker pink color and group (Control-G) both elements of the ear.
Hold Alt-Shift and drag the ear to the opposite side, creating a copy.

Step 11
Select the ears, click right mouse button and Arrange > Send to Back (Shift-Control-[), placing the ears behind the head.

Step 12
Now we can finish up the portrait either by leaving it as it is on a blank canvas or by placing a 600×600 px turquoise rectangle in the bottom of the Layers panel. Use the Line Segment Tool (\) to make thick 14 pt horizontal lines, making the background a bit more detailed.

Congratulations! Our Hipster Character is Finished!
That’s all for this tutorial, my friends! I hope you’ve enjoyed following these simple instructions and learned some new tips and tricks for your own flat-style characters. Feel free to transform your own photo into a fancy avatar, using the above-described techniques. Have fun!


