Tutorial Details
- Program: Adobe Illustrator CS5 – Adobe Illustrator CC
- Difficulty: Beginner-Intermediate
- Topics Covered: Basic Tools and Effects, Transform and Distort techniques plus the Appearance panel
- Estimated Completion Time: 45 minutes
Final Image
As always, this is the final image that we’ll be creating:
Step 1
Hit Command + N to create a new document. Enter 600 in the width and in the height boxes, then click on the Advanced button. Select RGB, Screen (72 ppi) and make sure that the Align New Objects to Pixel Grid box is unchecked before you click OK.
Enable the Grid (View > Show Grid) and the Snap to Grid (View > Snap to Grid). For starters you will need a grid every 1px, so simply go to Edit > Preferences > Guides > Grid, enter 5 in the Gridline every box and 1 in the Subdivisions box.
You should also open the Info panel (Window > Info) for a live preview with the size and position of your shapes. Do not forget to set the unit of measurement to pixels from Edit > Preferences > Units > General. All these options will significantly increase your work speed.
Step 2
Pick the Rectangle Tool (M) and focus on your Toolbar. Remove the color from the stroke; then select the fill, and set its color at R=230 G=231 B=232. Move to your Artboard and simply create a 30 x 80px rectangle, the Snap to Grid should ease your work.
Switch to the Direct Selection Tool (A) and focus on the left side of this new shape. Select both anchor points and simply drag them 10px up. In the end, things should look like in the second image. Make sure that this grey shape is still selected and go to Effect > Distort & Transform > Transform.
Enter the properties shown in the following image, click OK and go to Object > Expand Appearance. Move to the Layers panel (Window > Layers), make sure that the resulting groups is selected and hit Shift + CTRL + G twice to Ungroup it.
Get millions of stock images and videos at the best price
Unlimited access. No attribution required. Starts at just $9/month.
In the end, you should have three simple shapes. Keep focusing on the Layers panel, double click on the bottom shape and name it “rightFold“. Move up to the next shape and name it “middleFold“. Finally, double click on the top shape and name it “leftFold“.
Step 3
Select the “middleFold” shape and go to Object > Transform > Reflect. Check the Horizontal box and click the OK button. Make sure that your “middleFold” shape is still selected and replace the existing fill color with R=188 G=190 B=193.
Step 4
Reselect all three shapes created so far and duplicate them (CTRL + C > CTRL + F). Select these copies, open the Pathfinder panel (Window > Pathfinder) and click the Unite button. Fill the resulting shape with black and send it to back (Shift + CTRL + [ ).
Step 5
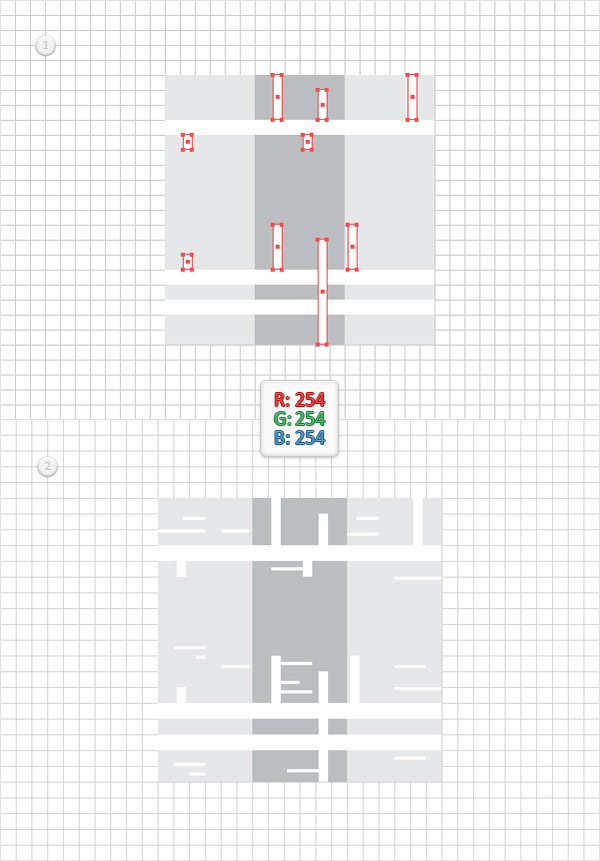
Using the Rectangle Tool (M), create three 30 x 90px rectangles and place them right above the existing shapes, as shown in the first image. Fill the middle rectangle with R=188 G=190 B=192, then select the other two shapes and set the fill color at R=230 G=231 B=232. Make sure that the Rectangle Tool (M) is still active, create twelve 30 x 5px shapes, place them as shown in the second image and set the fill color at R=254 G=254 B=254.
Step 6
For this step you will need a grid every 1px, so go to Edit > Preferences > Guides & Grid and enter 1 in the Gridline every box.
Set the fill color at R=254 G=254 B=254, pick the Rectangle Tool (M), create several rectangles with the width set at 3px and place them roughly as shown in the first image. Just make sure that these new shapes cover only one of the three grey rectangles that lay behind.
Continue with the Rectangle Tool (M), create a bunch of rectangles with the height set at 1px and place them roughly as shown in the first image.
Step 7
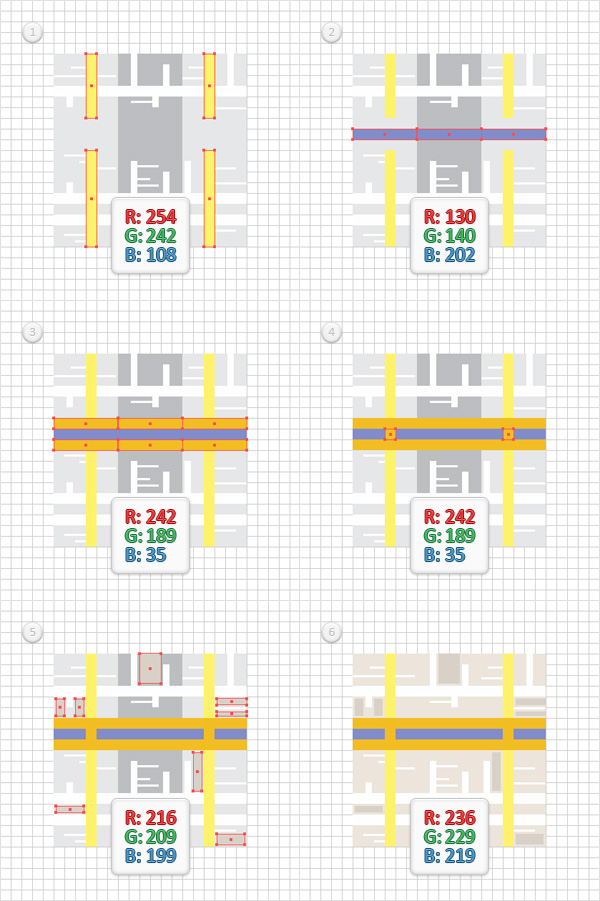
Return to “Gridline every 5px “, so simply go to Edit > Preferences > Guides & Grid and enter 5 in the Gridline every box. Set the fill color at R=254 G=242 B=108 and pick the Rectangle Tool (M).
Create two 5 x 30px shapes and two 5 x 45px shapes and place them as shown in the first image. Set the fill color at R=130 G=140 B=202, create three 30 x 5px shapes and place them as shown in the second image.
Set the fill color at R=242 G=189 B=35, create six 30 x 5px shapes and place them as shown in the third image then create two 5px squares and place them as shown in the fourth image. Set the fill color at R=216 G=209 B=199 and add some simple rectangles as shown in the fifth image.
Finally, reselect the three grey rectangles in the back and replace the existing fill colors with R=236 G=229 B=219.
Step 8
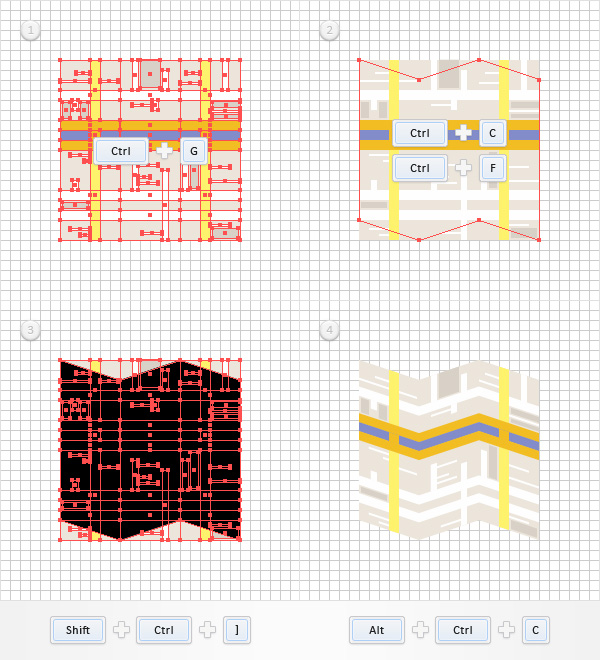
Select all the shapes made in the last three steps and Group them (CTRL + G).
Focus on the Layers panel, select your black shape, make a copy in front (CTRL + C > CTRL + F) and bring it to front (Shift + CTRL + ] ). Select this copy along with the group made in the beginning of the step and hit Alt + CTRL + C (or go to Object > Envelope Distort > Make With Top Object).
In the end things should look like in the fourth image.
Step 9
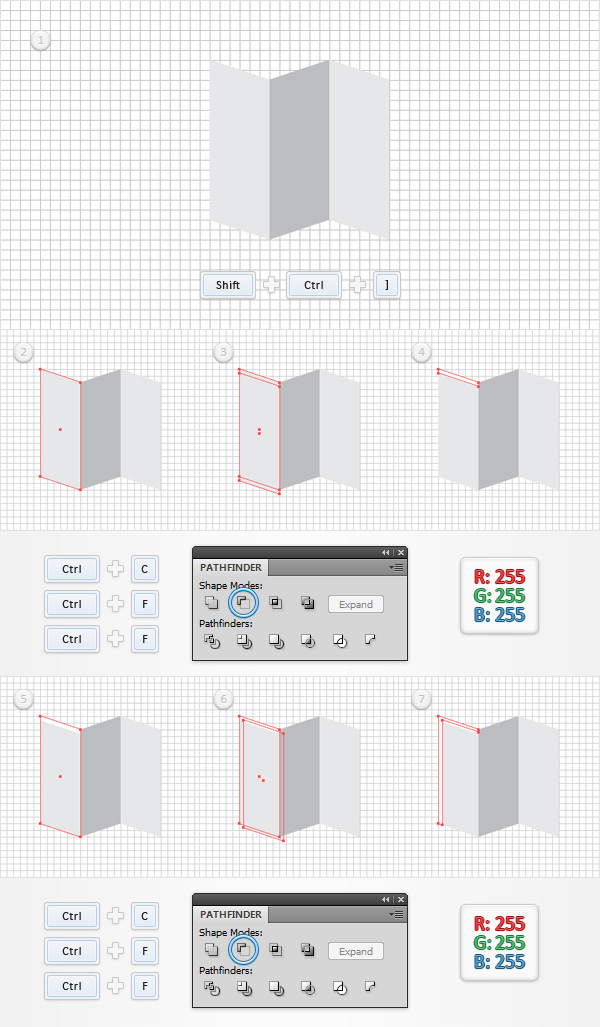
Focus on the Layers panel, select the “leftFold“, “middleFold” and “rightFold” shapes and bring them to front (Shift + CTRL + ] ). Disable the Snap to Grid (View > Snap to Grid) then go to Edit > Preferences > General and make sure that the Keyboard Increment is set at 1px. Select your “leftFold” shape and make two copies in front (CTRL + C > CTRL + F > CTRL + F). Select the top copy and hit the down arrow three times to move it 3px down. Reselect both copies and click the Minus Front button from the Pathfinder panel. Fill the resulting shape with white. Reselect the “leftFold” shape and make another two copies in front (CTRL + C > CTRL + F > CTRL + F). Select the top copy and move it 3px down and 3px to the right. Reselect both copies and click the Minus Front button from the Pathfinder panel. Fill the resulting shape with white.
Step 10
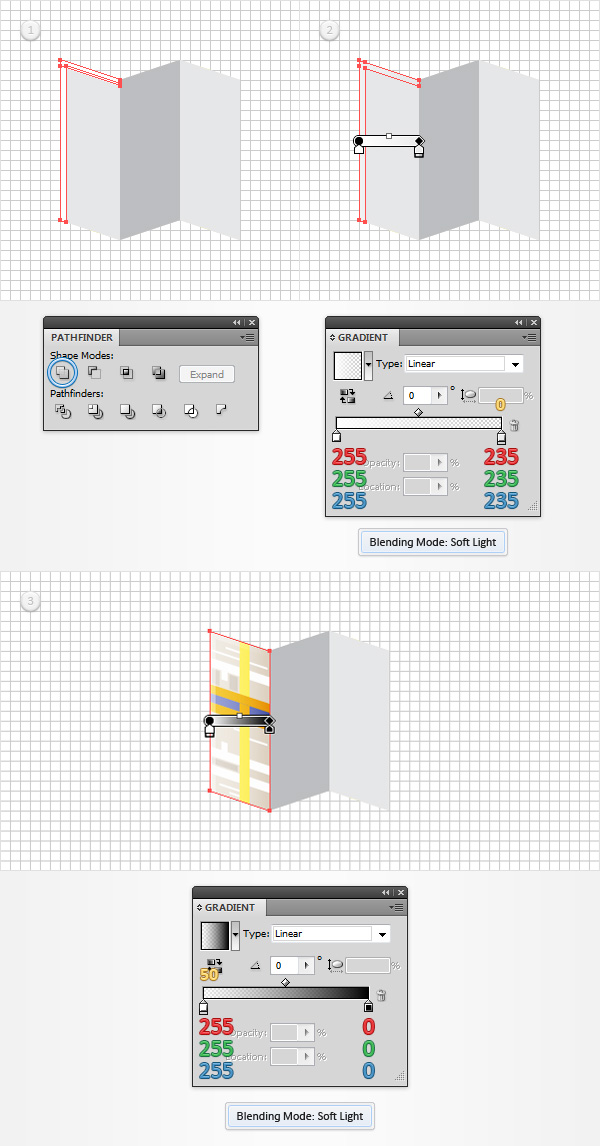
Reselect both white shapes made in the previous step and click the Unite button from the Pathfinder panel. Fill the resulting shape with the linear gradient shown in the second image and change the Blending Mode to Soft Light. Reselect your “leftFold” shape, replace the flat color used for the fill with the linear gradient shown in the third image and then change the Blending Mode to Soft Light. The yellow numbers from the Gradient image stand for Opacity percentage.
Step 11
Select your “middleFold” shape and make two copies in front (CTRL + C > CTRL + F > CTRL + F). Select the top copy and move it 3px down. Reselect both copies and click the Minus Front button from the Pathfinder panel. Fill the resulting shape with black. Reselect the “middleFold” shape and make another two copies in front (CTRL + C > CTRL + F > CTRL + F). Select the top copy and move it 1px to the right. Reselect both copies and click the Minus Front button from the Pathfinder panel. Fill the resulting shape with black.
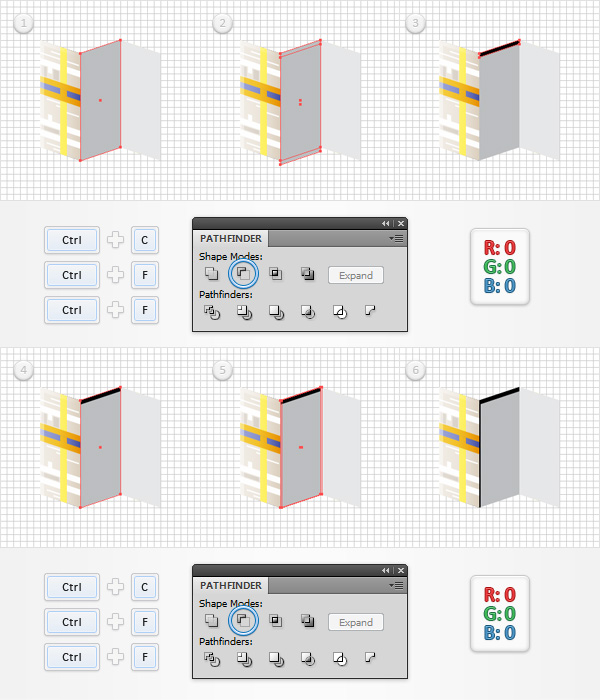
Step 12
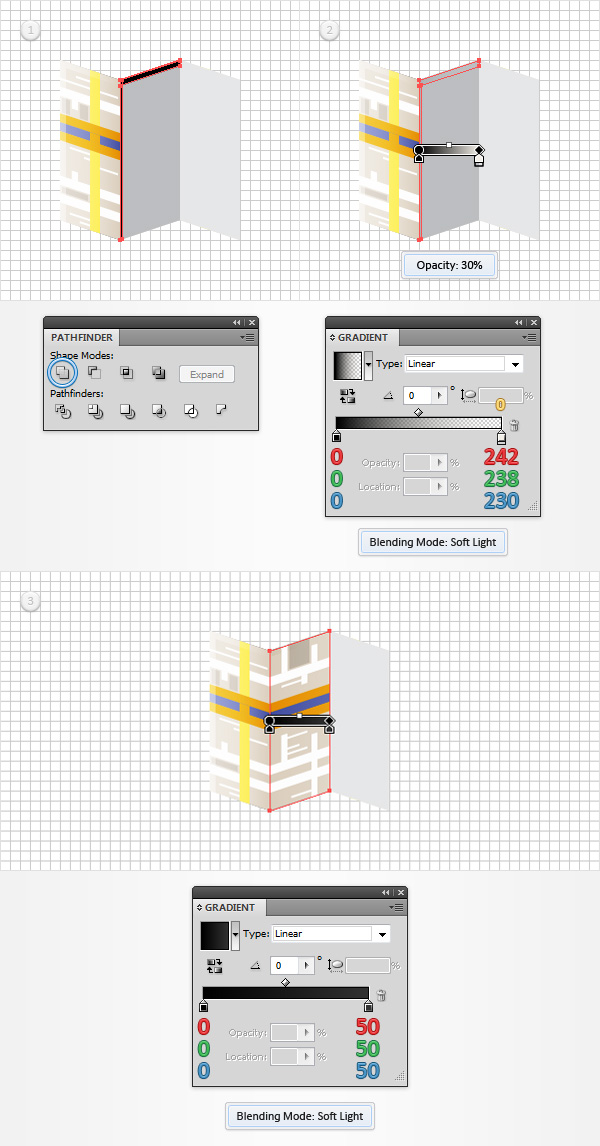
Reselect both black shapes made in the previous step and click the Unite button from the Pathfinder panel. Fill the resulting shape with the linear gradient shown in the second image, lower its Opacity to 30% and change the Blending Mode to Soft Light. Reselect your “middleFold” shape, replace the flat color used for the fill with the linear gradient shown in the third image and then change the Blending Mode to Soft Light. Remember that the yellow numbers from the Gradient image stand for Opacity percentage.
Step 13
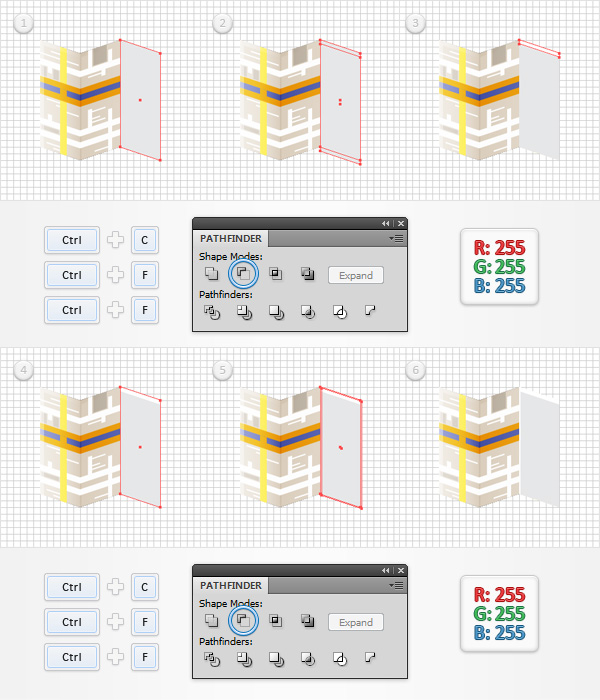
Select your “rightFold” shape and make two copies in front (CTRL + C > CTRL + F > CTRL + F). Select the top copy and move it 3px down. Reselect both copies and click the Minus Front button from the Pathfinder panel. Fill the resulting shape with white. Reselect the “rightFold” shape and make another two copies in front (CTRL + C > CTRL + F > CTRL + F). Select the top copy and move it 1px down and to the right. Reselect both copies and click the Minus Front button from the Pathfinder panel. Fill the resulting shape with white.
Step 14
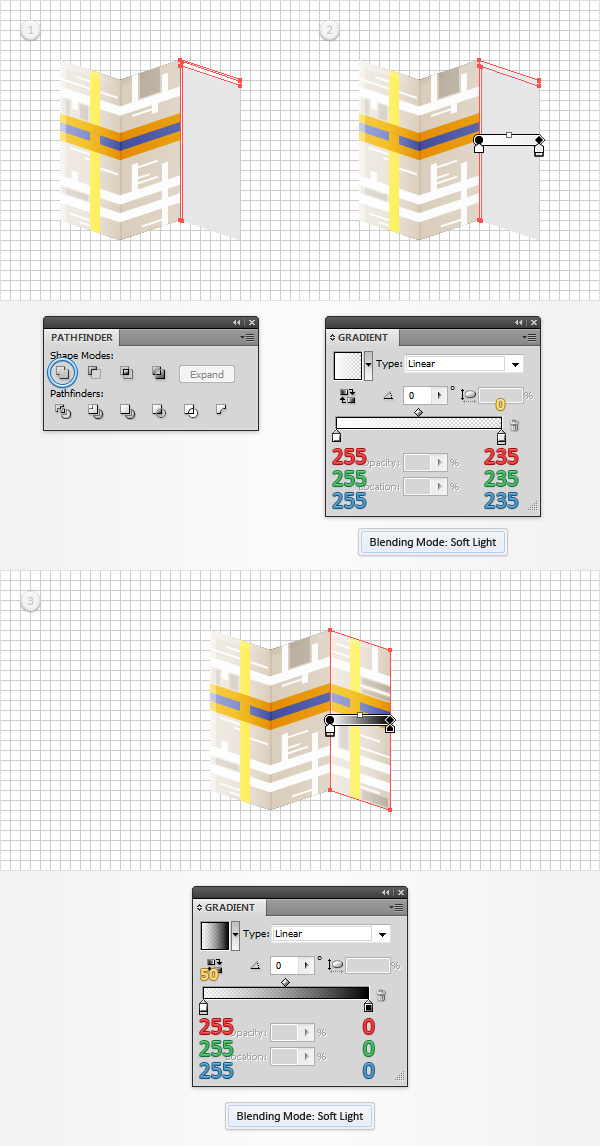
Reselect both white shapes made in the previous step and click the Unite button from the Pathfinder panel. Fill the resulting shape with the linear gradient shown in the second image and change the Blending Mode to Soft Light. Reselect your “rightFold” shape, replace the flat color used for the fill with the linear gradient shown in the third image and then change the Blending Mode to Soft Light.
Step 15
Focus on the Layers panel, select the black shape, make a copy in front (CTRL + C > CTRL + F) and bring it to front (Shift + CTRL + ] ). Make sure that this copy is selected and hit Shift + X to transfer the color properties from the fill to the stroke. Select this new stroke, align it to inside, set the size at 2pt and go to Object > Path > Outline Stroke. Fill the resulting shape with the linear gradient shown in the following image.
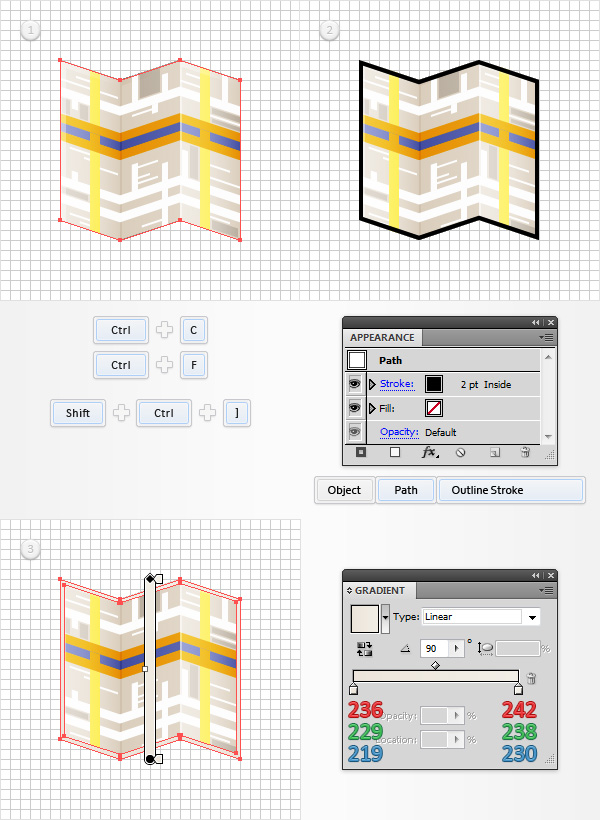
Step 16
Focus on the Layers panel, reselect that black shape, make a new copy in front (CTRL + C > CTRL + F) and bring it to front (Shift + CTRL + ] ). Make sure that this copy stays selected and hit Shift + X. Select this newly added stroke, align it to inside, set the size at 1pt and go to Object > Path > Outline Stroke. Fill the resulting shape with the linear gradient shown in the following image.
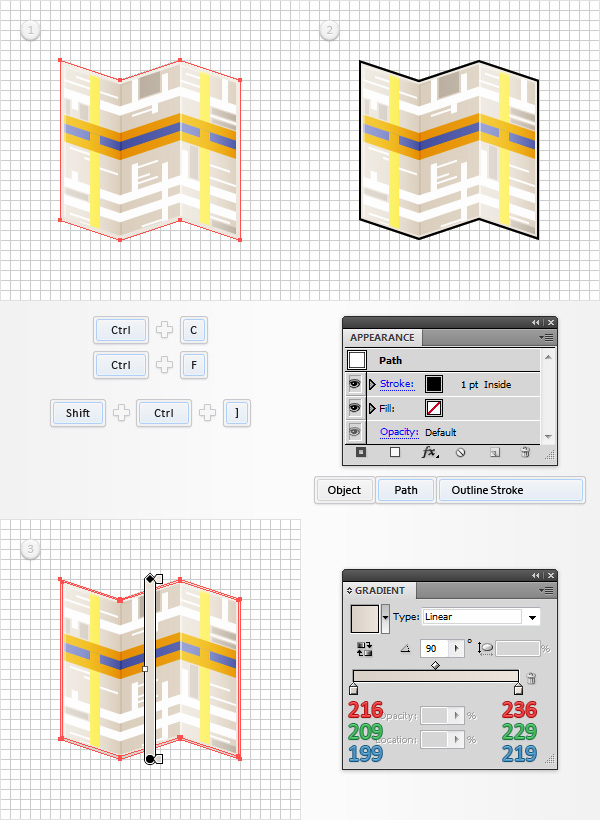
Step 17
Focus on the Layers panel, reselect that black shape and open the Appearance panel (Window > Appearance). Using the Add New Fill button (pointed by the little, blue arrow in the following image), add two new fills for this shape. Select the bottom fill, lower its Opacity to 3% and go to Effect > Distort & Transform > Transform. Enter the properties shown in the following image, click OK and return to the Appearance panel. Move up to the next fill, select it, lower the Opacity to 3% and go again to Effect > Distort & Transform > Transform. Enter the properties shown below, click OK and get back to the Appearance panel. Select the top fill and simply go to Effect > Stylize > Drop Shadow. Enter the properties shown in the following image and click OK.
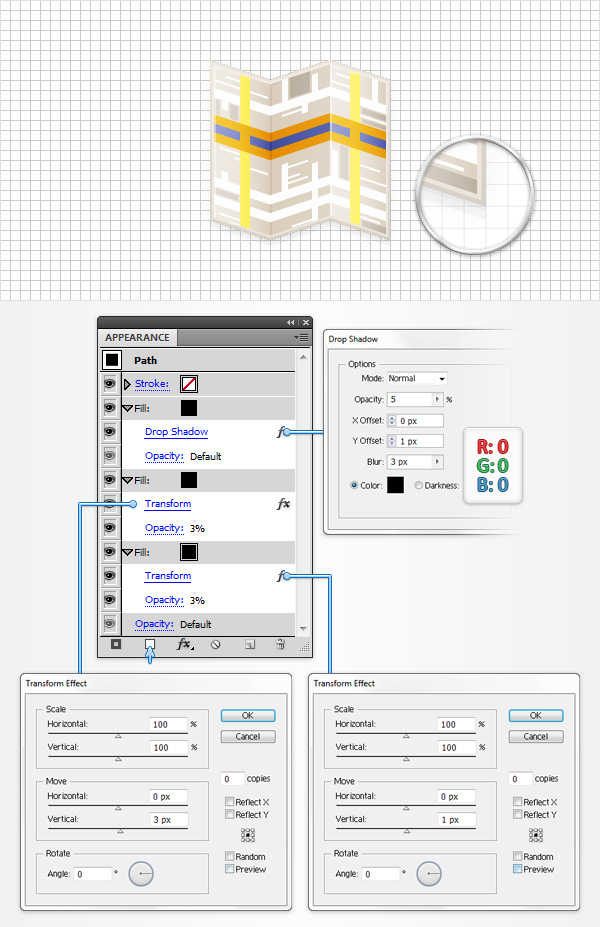
Step 18
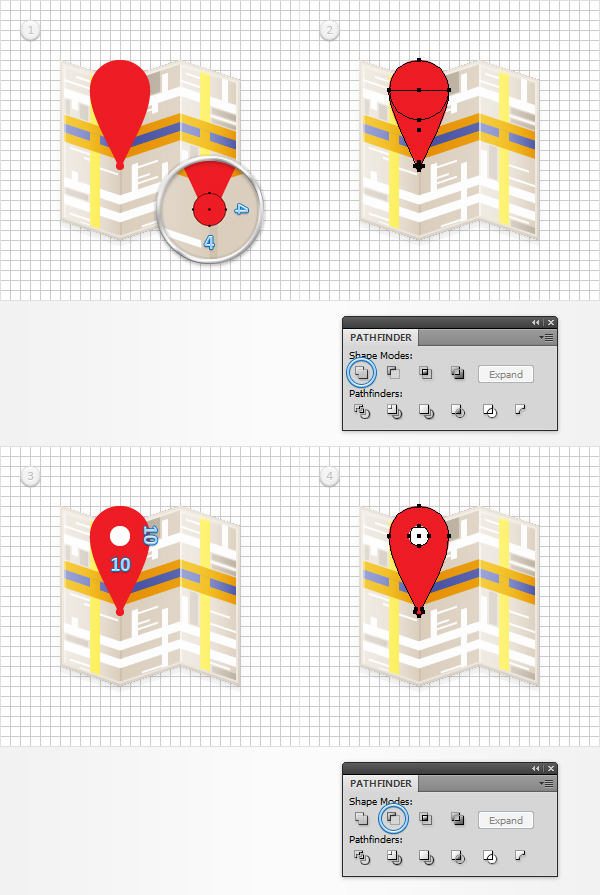
Enable the Snap to Grid (View > Snap to Grid). Using the Ellipse Tool (L), create a 30px circle, set the fill color at R=237 G=28 B=36 and place it as shown in the first image. Pick the Rectangle Tool (M), create a 30 x 40px rectangle, fill it with the same color and place it as shown in the second image. Switch to the Direct Selection Tool (A) and focus on the bottom side of this new rectangle. Select both anchor points and hit Alt + CTRL + J (or go to Object > Path > Average). Check the Both button and click OK. This should turn your rectangle into a sharp triangle. Select it and go to Effect > Warp > Bulge. Enter the properties shown in the fourth image, click OK and go to Object > Expand Appearance.
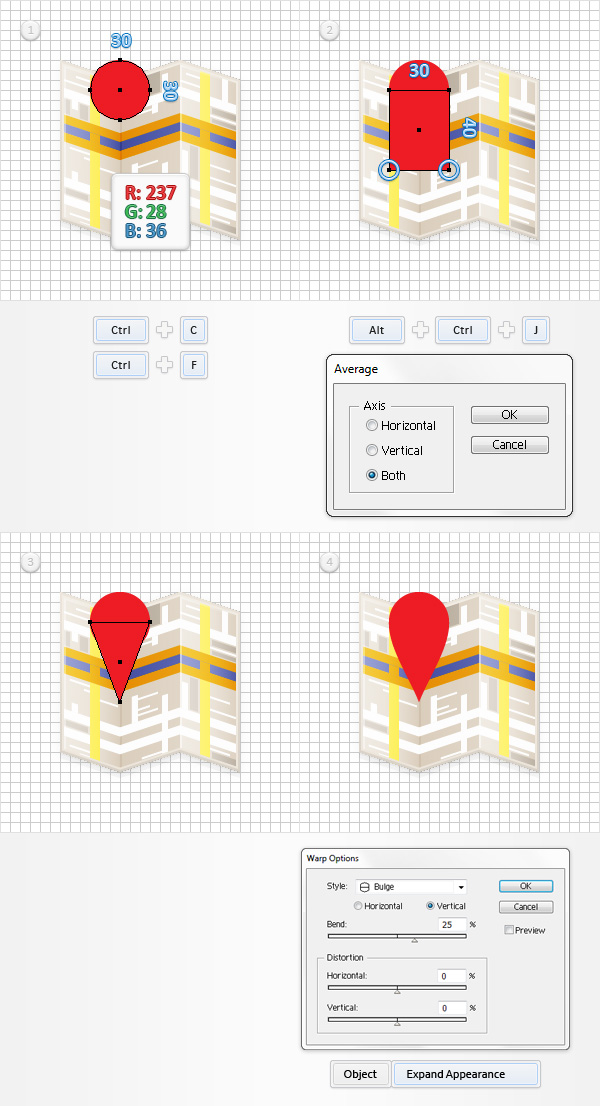
Step 19
Switch to “gridline every 1px“, so go to Edit > Preferences > Guides & Grid and enter 1 in the Gridline every box. Using the Ellipse Tool (L), create a 4px circle and place it as shown in the first image. Select this tiny circle along with the two red shapes, and click the Unite button from the Pathfinder panel. Return to “gridline every 5px “, so simply go to Edit > Preferences > Guides & Grid and enter 5 in the Gridline every box. Grab the Ellipse Tool (L), create a 10px circle and place it as shown in the third image. Select this new circle along with the red shape and click the Minus Front button from the Pathfinder panel.
Step 20
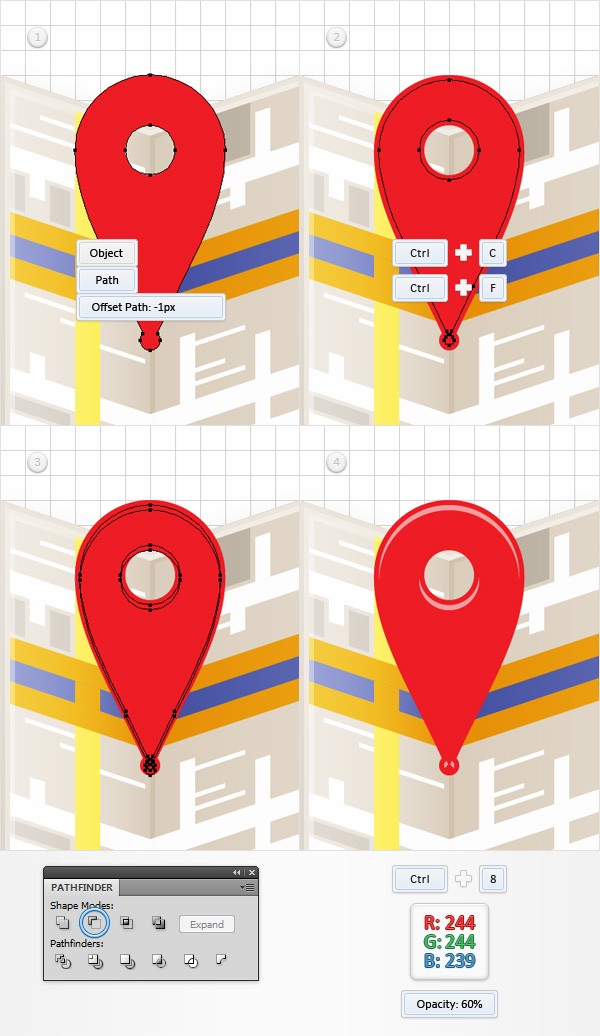
Disable the Snap to Grid (View > Snap to Grid). Select the red shape and go to Object > Path > Offset Path. Enter a -1px Offset and click OK. Select the resulting shape and make a copy in front (CTRL + C > CTRL + F). Select this fresh copy and move it 1px down. Reselect both shapes made in this step and click the Minus Front button from the Pathfinder panel. Turn the resulting group of shapes into a compound path (CTRL + 8 or Object > Compound Path > Make), set the fill color at R=244 G=244 B=239 and lower its Opacity to 60%.
Step 21
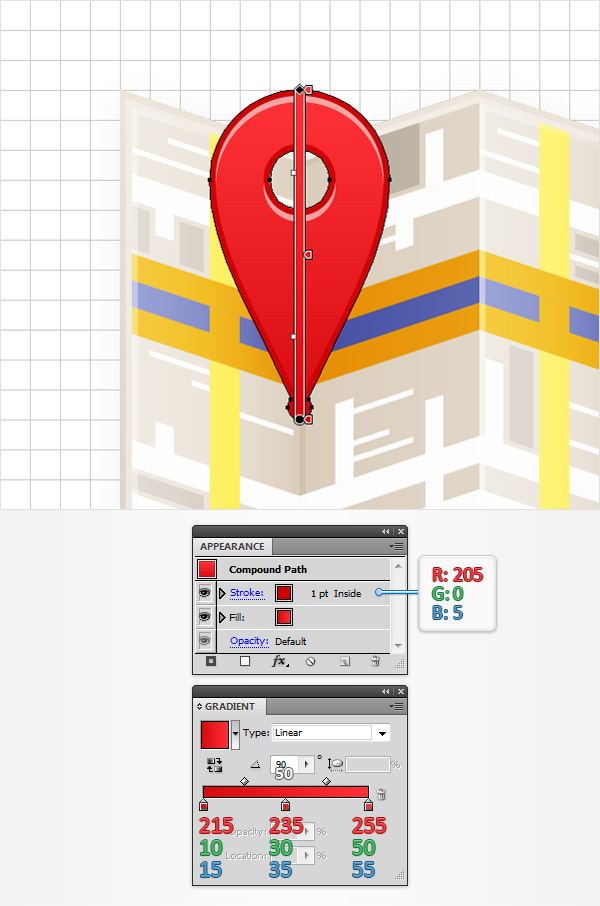
Select the red shape and focus on the Appearance panel. First, replace the flat color used for the fill with the linear gradient shown in the following image. Next, add a 1pt stroke, align it to inside and set the color at R=205 G=0 B=5.
Step 22
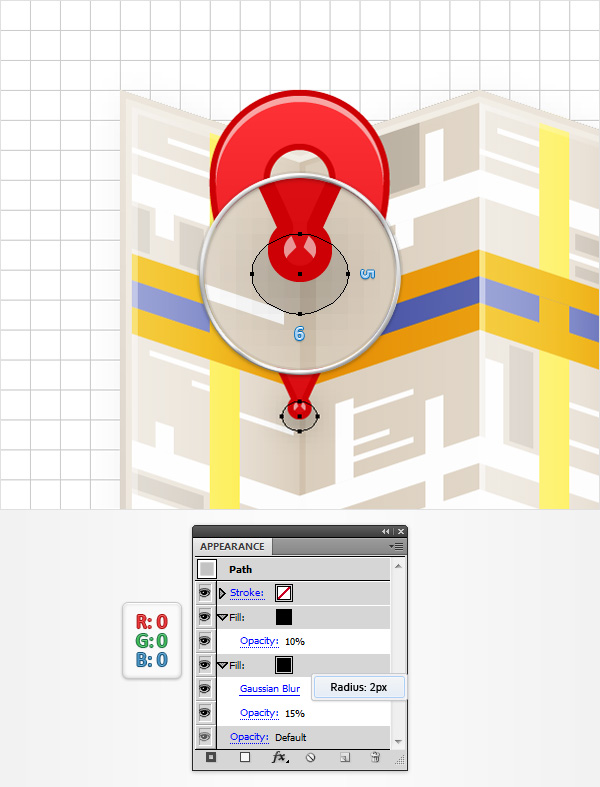
Switch to “gridline every 1px“, so go to Edit > Preferences > Guides & Grid and enter 1 in the Gridline every box. Using the Ellipse Tool (L), create a 6 x 5px shape, set the fill color at black and place it as shown in the following image. Focus on the Layers panel, make sure that this new shape stays selected, drag it below the red compound path and move to the Appearance panel. Select the existing fill, lower its Opacity to 15% and go to Effect > Blur > Gaussian Blur. Enter a 2px radius and click OK. Return to the Appearance panel and add a second black fill. Select it and simply lower the Opacity to 10%.
And We’re Done!
I hope you’ve enjoyed this tutorial and can apply these techniques in your future projects.
